How to Install Parquet Flooring: Patterns, Prep, and Techniques Explained
Installing parquet flooring requires more than just choosing a stylish pattern—it demands careful preparation, precise techniques, and an understanding of how each step contributes to a long-lasting result. In this guide, you'll find clear, practical advice on selecting the right parquet pattern, prepping your subfloor, and using professional installation methods. Whether you’re a seasoned floor installer or a homeowner planning a renovation, this article breaks down the essentials to help you achieve a durable, attractive parquet floor with confidence.
Understanding Parquet Flooring Installation
Parquet flooring installation brings a blend of durability, design flexibility, and timeless appeal to commercial environments such as offices, hotels, and retail spaces, as well as private homes. With precise patterns and high-quality materials, solid wood parquet floors deliver both visual impact and long-lasting performance. Whether you’re focused on a statement look for a cultural institution or seeking a floor that will last for generations at home, understanding the fundamentals of parquet flooring installation is the first step toward a successful project. If you are interested in finding out more about the available hardwood options and patterns, you can view Junckers’ wide parquet flooring selection.
Choosing the Right Parquet Pattern for Your Project
Selecting the right pattern is essential for ensuring your parquet flooring installation meets the demands of your space, both functionally and aesthetically. Junckers offers a range of options, from classic to contemporary designs, all crafted with solid hardwood for superior durability.
Classic and Modern Parquet Patterns Explained
- Herringbone: A traditional favorite, herringbone uses rectangular blocks laid in a zigzag formation for a dynamic, architectural look. Suitable for both large commercial areas and intimate residential rooms. See more about Junckers' herringbone parquet flooring.
- Chevron: Similar to herringbone, but with the ends of the planks cut at an angle to produce a continuous “V” pattern, creating a streamlined effect.
- English bond (brick pattern): Strips are laid parallel and offset, resulting in an orderly and harmonious appearance ideal for formal and public spaces.
- Old German bond: Features parallel strips interrupted by short blocks rotated 90 degrees, adding distinct character and movement to the floor.
- Geometric patterns: Innovative shapes like hexagons, diamonds, and triangles offer unique visual interest, especially in modern or creative environments. Discover the possibilities with Hexparket, Junckers' parquet design with a graphic look.
Factors Influencing Pattern Selection
- Room size and shape: Large patterns make a statement in open spaces, while smaller patterns suit compact areas.
- Design intent: Choose a pattern that complements your overall design vision—classic, contemporary, or bold.
- Usage demands: High-traffic areas may benefit from certain layouts that better distribute wear.
- Installation method: Some patterns are better suited for glue-down or batten systems, so always coordinate your choice with the recommended installation methods for your project.
Preparing for Parquet Flooring Installation
Proper preparation ensures a flawless parquet flooring installation and maximizes the lifespan of your floor. Before installation begins, follow these preparation steps:
Subfloor Inspection and Preparation
- Clean the subfloor thoroughly, removing dust, oil, grease, or any remnants of old flooring.
- Check for levelness; use a straightedge to find and correct any high or low spots.
- The subfloor must be dry and stable. Moisture content should be tested and within recommended limits to prevent future expansion or contraction.
Acclimatizing Your Parquet Flooring
- Bring the parquet flooring into the installation environment several days before starting.
- Allow the wood to adjust to the room’s temperature and humidity—this minimizes the risk of movement after installation.
- Stack packs flat and off the ground in the installation space.
Choosing the Right Underlay and Moisture Barriers
- Use an underlay suitable for solid wood, such as foam underlay for clip floors, to reduce impact sound and minor floor imperfections.
- In areas prone to moisture, such as ground floors or over concrete, a vapor barrier is essential.
- For glue-down installations, refer to the appropriate materials for glued floors H 6.0.
- Ensure compatibility with underfloor heating systems, as Junckers floors are designed for such setups.
Step-by-Step Guide to Parquet Flooring Installation
The following guide covers the essential steps for a professional and efficient parquet flooring installation, applicable to both commercial and residential projects.
Laying Out Your Pattern and Marking the Room
- Determine the center of the room or the main focal point, such as a fireplace or feature wall.
- Use chalk lines or a laser to mark starting lines for your chosen pattern.
- Dry lay a small section first to visualize alignment and make adjustments before fixing blocks in place.
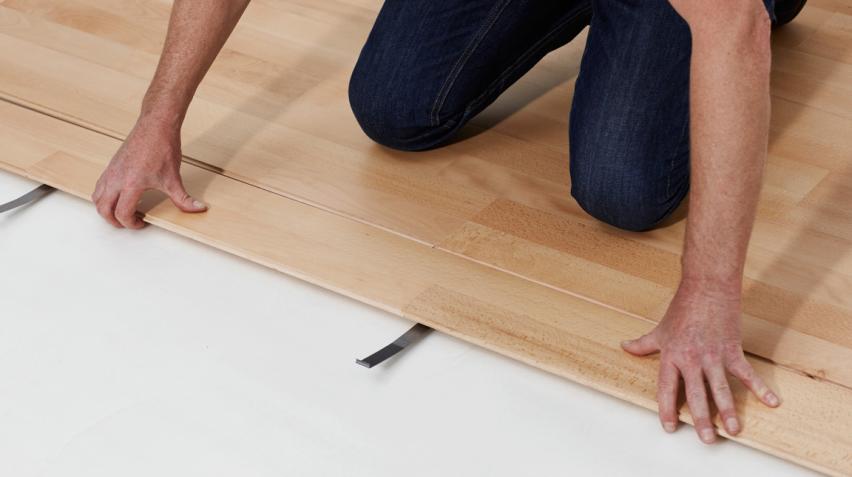
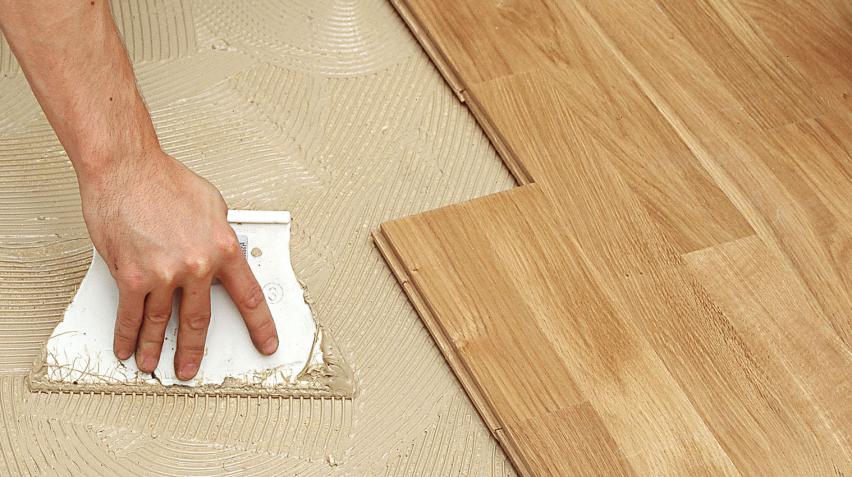
Applying Adhesive and Installing Parquet Blocks
- Select an adhesive compatible with both the subfloor and your chosen wood species.
- Apply adhesive evenly in manageable sections using a notched trowel.
- Place the parquet blocks according to your pattern, pressing each piece firmly to ensure full contact.
- Continue laying blocks, checking alignment regularly and adjusting as needed.
Allowing for Expansion and Movement
- Always leave an expansion gap (typically 10–20 mm (3/8–3/4 in)) around the perimeter of the room and against fixed structures.
- Use spacers to maintain consistent gaps, allowing the natural wood to move with changes in temperature and humidity.
Finishing Touches and Post-Installation Checks
- After all blocks are installed, roll the floor with a weighted roller to ensure maximum adhesion.
- Install skirting boards or moldings, but avoid attaching them directly to the parquet to allow for movement.
- Clean the surface carefully and inspect the entire installation for gaps, misalignments, or adhesive residue.
Parquet Flooring Installation Tips for Lasting Results
- Avoid placing heavy furniture or built-in units directly on the parquet flooring, which can restrict natural movement.
- Protect the floor during other construction or renovation work—never apply adhesive tape directly to the wood surface.
- Regularly inspect and maintain your floor according to the manufacturer’s guidelines to ensure optimal performance. For oiled finishes, consult Junckers’ maintenance guide for oiled hardwood floors G 2.0.
- For high-traffic areas, consider routine professional maintenance to keep the finish in top condition.
Sustainable Solutions and Certifications with Junckers Parquet Flooring
Junckers places a strong emphasis on sustainability in every aspect of parquet flooring installation. All Junckers floors are manufactured from responsibly sourced wood and are either FSC® or PEFC-certified. Many floors are also certified for low indoor emissions, making them suitable for projects prioritizing indoor air quality and environmentally friendly building standards. This commitment ensures that your flooring solution supports both the environment and the well-being of those using the space. Find more about sustainable wood flooring and certifications.
Need Project Support for Parquet Flooring Installation?
Whether you’re managing a large-scale commercial project or renovating a private home, expert advice can make all the difference in your parquet flooring installation. Junckers’ dedicated technical team is ready to assist with product selection, installation methods, and ongoing maintenance guidance. For tailored support, or to review available flooring systems and approaches, visit Junckers’ installation methods or our guidance section, to ensure your next project is a success.