Hardwood Flooring Installation Guide: Preparation, Method, and Aftercare
Installing hardwood flooring is a significant home improvement project that delivers lasting beauty and value to your living space. This guide gives you clear, step-by-step instructions for every stage of the process—from essential preparation and choosing the right installation method, to the best practices for aftercare and maintenance. Whether you’re planning a renovation or outfitting a new home, you’ll find practical advice to help ensure your hardwood floors are properly installed and stay in excellent condition for years to come.
Why Choose Solid Hardwood Flooring for Your Home
Solid hardwood flooring brings lasting value, elegance, and warmth to any private residence. Whether you live in a house or an apartment, Junckers’ range of solid hardwood floors allows you to create a personal and stylish look that stands the test of time. With options including classic plank, 2-strip floors, decorative herringbone parquet, and exclusive HexParket, you can select a flooring solution that complements your lifestyle and interior design preferences. Every floor is crafted to combine durability with timeless appeal, making it a reliable investment for both new builds and renovation projects. In addition, Junckers sources wood from responsibly managed forests and offers surfaces that contribute to a healthy indoor climate, supporting your home and the environment. For an overview of the available wood species, finishes, and design options, see the full range of solid hardwood flooring.
Preparation Steps for Hardwood Flooring Installation
Thorough preparation is the foundation for a successful hardwood flooring installation. Follow these key steps to ensure optimal results:
- Acclimate your flooring: Place the unopened packs of solid hardwood flooring in the room where they will be installed. Allow them to acclimate for several days to the room’s temperature and humidity. For detailed acclimation instructions, refer to the Glued Hardwood Floors installation instructions.
- Prepare the subfloor: Make sure the subfloor is clean, dry, level, and structurally sound. Remove any old flooring, debris, or adhesives. Address squeaks or uneven areas, as these can affect the finished result. See Junckers installation methods for subfloor requirements.
- Plan the layout: Measure your space carefully and decide which direction the boards will run—typically parallel to the longest wall or to the main light source. Remember to leave an expansion gap (usually 10–20 mm) around the perimeter of the room to allow for natural wood movement, in accordance with Junckers standards.
These steps help prevent issues such as warping, gaps, or uneven surfaces, and ensure your hardwood floor will look and perform its best for years to come.
Choosing the Right Installation Method
Several installation methods are available for solid hardwood floors, and the right choice depends on your subfloor, skill level, and project needs.
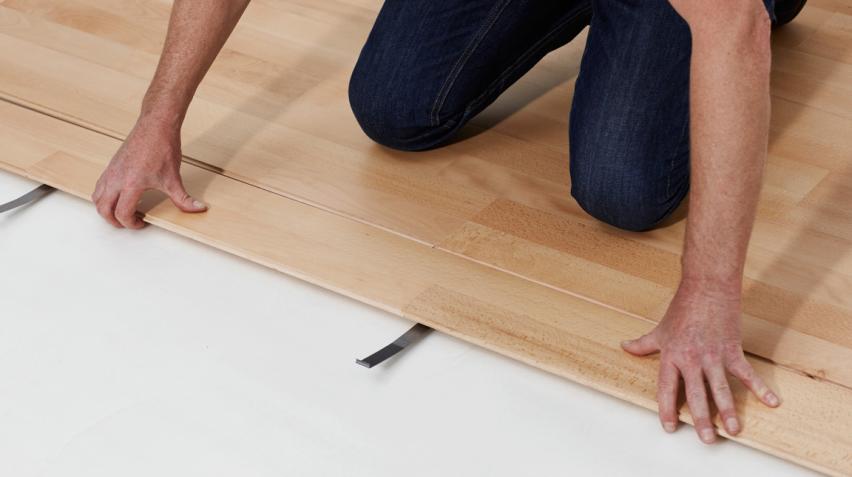
Click System Explained
The click system is a user-friendly installation method that allows boards to interlock securely without the need for nails or glue. This method is especially suitable for DIY projects, offering a fast, efficient, and clean solution for installing hardwood floors. It works well over most subfloors and is ideal for both apartments and houses. If you want a closer look at how this method works, you can find step-by-step instructions and a video guide about the Junckers clip system installation method.
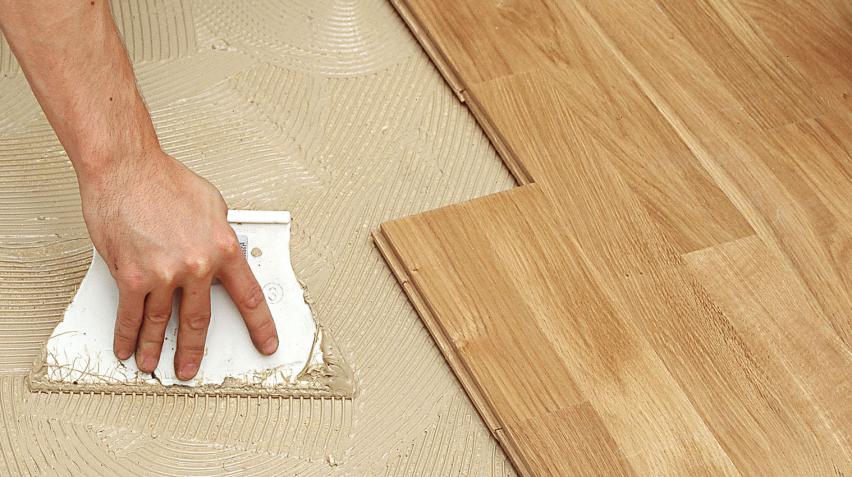
Glue-Down Installation Method
Glue-down installation involves applying adhesive to fix each board directly to the subfloor. This technique is particularly suitable for concrete subfloors and is compatible with underfloor heating systems. The glue-down method creates a stable, solid feel underfoot, and is often chosen for professional installations or areas where extra durability is required. For technical guidance, see Junckers' Glued Hardwood Floors installation instructions.
Battens Installation for Solid Hardwood Floors
Installing hardwood flooring on battens involves mounting the floorboards onto wooden battens secured to the subfloor. This method offers excellent acoustic and structural benefits, making it a preferred choice in situations where extra sound insulation or height adjustment is needed. It’s frequently used in renovation projects and can be combined with underfloor heating for added comfort. If you need technical details on this approach, see the overview of materials for floors installed with battens.
Step-by-Step Guide to Hardwood Flooring Installation
A clear process helps both homeowners and installers achieve a professional result:
- Start with the first row: Place the first row of boards along the starting line, ensuring the groove side faces the wall. Use spacers to maintain the expansion gap.
- Lay subsequent rows: Fit each new board tightly against the previous row, using the chosen method (click, glue, or battens) to secure them. Stagger end joints for a natural look and added strength.
- Trim around obstacles: Measure and cut boards as needed to fit around doorways, pipes, or other fixed features. Undercut door frames to allow boards to slide underneath for a seamless finish.
- Install finishing elements: Once all boards are laid, remove spacers and install baseboards or skirting to cover the expansion gap. Add any necessary transition strips between rooms or different floor types.
Taking your time with each step will help ensure your hardwood flooring installation is smooth, stable, and visually appealing.
Essential Aftercare and Maintenance Tips
Proper care will keep your hardwood flooring looking its best and extend its lifespan. Consider these maintenance practices:
- Routine cleaning: Sweep or vacuum regularly using a soft-bristle attachment to remove dust and grit.
- Damp mopping: Use a microfiber mop that is only lightly dampened, along with a cleaner designed for hardwood floors. Excessive water should be avoided.
- Protect against scratches: Place felt pads under furniture legs, use area rugs in high-traffic zones, and avoid walking on the floor with high heels or abrasive footwear.
- Manage spills quickly: Wipe up any liquid immediately to prevent stains or warping.
- Periodic checks: Inspect your floor for minor scuffs or damage and perform touch-ups as needed with recommended maintenance products. You can find a selection of professional finishes and sealers for hardwood floors developed for private homes.
These habits make it simple to preserve the natural beauty and durability of your solid hardwood floor. For best results, follow Junckers' full guide to cleaning and maintenance.
Junckers’ Commitment to Quality and Sustainability
Junckers is dedicated to providing high-quality, sustainable flooring solutions for private homes. All wood used in Junckers solid hardwood floors is sourced from responsibly managed forests with FSC® or PEFC certification, ensuring minimal environmental impact. Many floors also carry indoor climate labeling, supporting a healthy home environment. You can learn about the certifications and health standards on the page for Danish indoor climate labelling and wooden floors. Factory-finished surfaces mean less work for you and a more predictable installation process. Choosing Junckers means selecting a floor that is designed to last for generations while supporting both responsible forestry and indoor wellbeing.
Need Advice or Support? Contact Junckers
If you have questions about your hardwood flooring installation or want help choosing the right Junckers solution for your home, our team is ready to assist. Visit our contact page to get in touch with our experts or find a qualified local installer. We’re here to ensure your flooring project is a success from start to finish.
Frequently Asked Questions About Hardwood Flooring Installation
Is Junckers hardwood flooring suitable for underfloor heating? add
Yes, Junckers solid hardwood floors are fully compatible with underfloor heating systems. This provides comfort and efficiency without compromising the floor’s integrity. Technical details for batten systems with underfloor heating are available in the documentation for batten floors with underfloor heating.
Which installation method should I use? add
The best method depends on your subfloor and project setup. The click system is ideal for DIY and speed; glue-down works well over concrete and with underfloor heating; battens offer acoustic and leveling benefits for more complex renovations.
Can I install Junckers hardwood flooring myself? add
Many Junckers floors are designed for straightforward installation, especially with the click system. However, professional installers can ensure the best results, especially for glue-down or batten installations. See more in the installation methods guide.
How do I maintain my floor’s finish? add
Use only recommended products for cleaning and maintenance, and avoid excessive moisture. Regular care will keep your floor looking beautiful for years. Refer to Junckers' maintenance guide here.
For additional information, you can read the installation guides for the clip system or reach out for personal advice.