Gluing Hardwood Floors to Concrete: Step-by-Step Installation Guide
Installing hardwood floors over concrete requires precision and the right approach to ensure long-lasting results. This guide provides a clear, step-by-step overview of the glue-down installation method, covering essential preparation, material selection, and practical tips for achieving a durable, stable hardwood floor. Whether you’re working on a commercial project or a residential renovation, you’ll find straightforward instructions to help you complete the job with confidence and efficiency.
Understanding the Glue-down Method for Commercial Flooring Projects
Gluing hardwood floors to concrete is a trusted installation method for commercial spaces where durability, aesthetics, and efficient installation matter. The glue-down process involves adhering solid hardwood planks directly to a prepared concrete subfloor using a compatible adhesive. This approach is particularly effective in offices, hotels, cultural institutions, and retail spaces—environments that demand a stable and long-lasting flooring solution. Junckers offers a wide selection of solid wood floors, including classic plank, 2-strip, and unique patterns like herringbone and HexParket, all suitable for the glue-down method. For further inspiration on solutions for professional spaces, visit the page about commercial hardwood flooring.
Preparing the Concrete Subfloor
A successful installation starts with proper subfloor preparation. The concrete surface must be:
- Clean and free of dust, oil, wax, or old adhesives
- Even and level to within the manufacturer’s tolerances
- Fully dry, with no residual construction moisture
Take the time to thoroughly inspect the subfloor. Remove contaminants, fill minor cracks, and grind down any high spots before proceeding. For detailed technical requirements and step-by-step instructions, see Junckers' glued hardwood floors specifier’s and installation instructions.
Moisture Testing and Vapor Barriers
Moisture is a critical factor in gluing hardwood floors to concrete. Always perform a moisture test using an accurate moisture meter. If the moisture content exceeds recommended levels, delay installation until the slab reaches a safe range. For added protection, especially in ground floor and basement applications, install a vapor barrier—such as Junckers SylvaThene moisture barrier (0.20 mm PE membrane)—before applying adhesive. This step helps prevent future moisture-related issues such as cupping or bonding failure. Product specifications and best-practice advice can be found on the SylvaThene moisture barrier product sheet.
Choosing the Right Hardwood and Adhesive
Selecting the correct materials ensures a robust and attractive finished floor.
- Choose from Junckers’ range of solid hardwood floors, available in oak, ash, and beech, with factory-applied finishes such as ultra matt lacquer or oil. See the complete solid hardwood flooring collection.
- Match your choice of adhesive to both the flooring and the concrete substrate. Only use adhesives approved by Junckers for our glue-down installation. See overview under glue for hardwood flooring.
- Verify that all materials are suitable for use over underfloor heating if your project requires it. For technical compatibility and best practices, consult the installation methods for wood flooring.
Acclimating Solid Hardwood Floors Before Installation
Proper acclimation reduces the risk of expansion, contraction, or gaps after installation.
- Bring the hardwood planks into the installation area at least a few days before starting, once the building’s temperature and humidity are within the recommended range (typically 35–65% RH, 18–22 °C).
- Store the planks flat and spaced to allow air circulation.
- Ensure the building is weathertight and the heating system is operational before delivery of flooring materials.
This step allows the wood to adjust to its environment, supporting a stable installation. Additional technical guidance is available in the glued hardwood floors specifier’s and installation instructions.
Step-by-Step Guide for Gluing Hardwood Floors to Concrete
Planning the Layout and Expansion Gaps
- Start by measuring the space and snapping a chalk line or string parallel to the longest wall.
- Plan for an expansion gap (typically 10–20 mm) around the room’s perimeter, columns, and other fixed elements. This accommodates natural wood movement and prevents buckling.
- For more on expansion considerations and alternatives, see the installation methods overview.
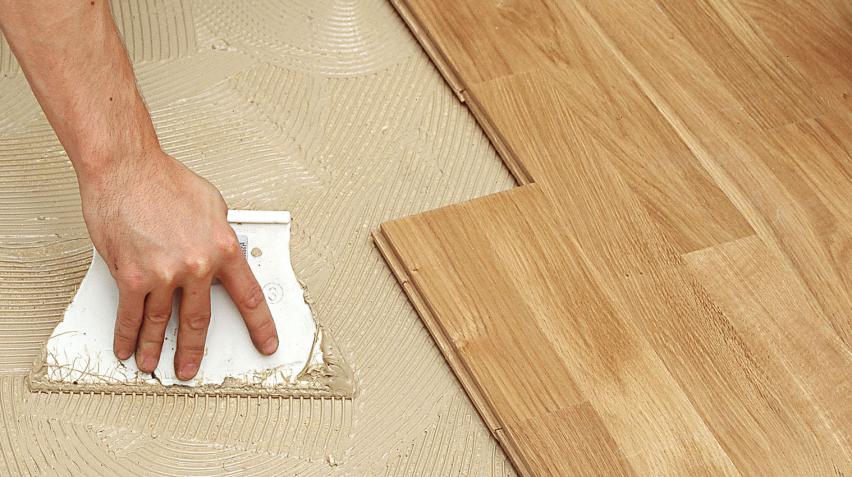
Applying Adhesive Correctly
- Use a notched trowel to spread adhesive evenly across a small, workable section of the subfloor.
- Work in manageable areas to prevent the adhesive from skinning over before the planks are laid.
- Follow the adhesive manufacturer’s guidelines on open time and coverage. See specific adhesive data sheets for details.
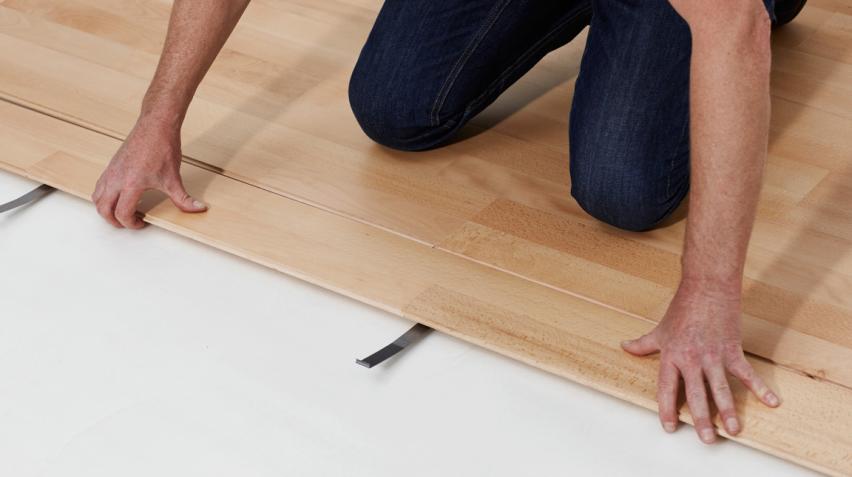
Laying the Planks and Ensuring Alignment
- Press each hardwood plank into the adhesive, ensuring a firm bond.
- For tongue-and-groove planks, interlock each piece securely.
- Use the chalk line as a guide to maintain straight rows.
- Employ floor clamps or straps if needed to keep planks tightly together as you progress.
Rolling and Finishing the Installation
- After each section is laid, use a heavy roller (approximately 45–50 kg) to ensure full contact between planks and adhesive.
- Wipe away excess adhesive from the floor surface promptly to avoid surface damage.
- Allow the adhesive to cure as specified in the adhesive product sheet—this may vary depending on temperature and humidity. Avoid foot traffic or moving furniture before full curing.
Common Mistakes to Avoid When Gluing Hardwood Floors to Concrete
- Failing to properly test and control subfloor moisture, which can result in floor movement or insufficient bonding.
- Skipping or inadequately installing the vapor barrier as required by Junckers' moisture protection instructions.
- Applying too much or too little adhesive, leading to hollow spots or weak bonds.
- Neglecting to leave expansion gaps, risking buckling or gaps as the wood naturally expands and contracts.
- Beginning installation before temperature and humidity are stable, or rushing delivery before conditions are ready.
Avoiding these pitfalls helps ensure a smooth, trouble-free installation. Full installation details are provided in the glued hardwood floors specifier’s and installation instructions.
Maintaining Glued Hardwood Floors in Commercial Settings
To maximize the lifespan and appearance of glued hardwood floors:
- Sweep or vacuum regularly to remove dirt and grit
- Use appropriate cleaning products for hardwood finishes
- Quickly address any spills to prevent staining or moisture damage
- Conduct periodic inspections for signs of wear, especially in high-traffic zones
- Reapply finish or perform maintenance according to manufacturer recommendations
For practical cleaning and care guidance specific to hardwood, refer to how to clean and maintain your hardwood floor.
Why Partner with Junckers for Your Commercial Flooring Installation
Junckers stands out as a dependable partner for commercial flooring installations. With a comprehensive range of CE-marked, FSC® or PEFC-certified solid hardwood floors, Junckers supports sustainable building practices and healthy indoor environments. Discover more about sustainable flooring and a sustainable mindset.
If you need expert advice, product selection assistance, or technical support, explore our comprehensive guidance for wooden flooring.